|
Guide for Installing Catalina and then compiling and running a simple
test program.
 |
This is a general guide and does not require a Flashpoint memory
module (although it wouldn't hurt). |
|
Step 1: Install Catalina
 |
I recommend using the
direct download link to grab the single self-extracting .exe
file that installs everything at once. But, you
might want to go to the
project page to
make sure 3.3 is still the latest version. Internet
Explorer 8 may give you a warning that this is an unusual
program, but don't worry, and "run anyway". |
|
By default, all the Catalina files will be installed to
"C:\Program Files (x86)\Catalina" if you are running a 64-bit
version of Windows or "C:\Program Files\Catalina" with a 32-bit
version of Windows. |
|
You should now have Catalina on your Start Menu like this:
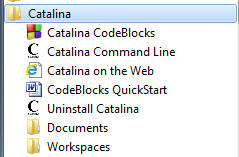
|
|
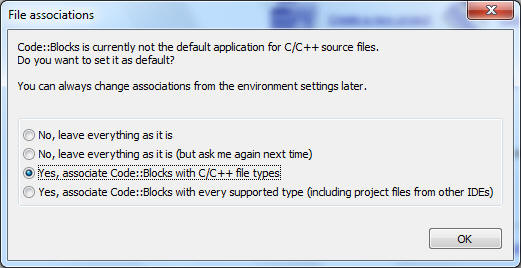
You might want to read "CodeBlocks QuickStart" (if you
didn't already after installation) and maybe the Catalina
Documentation under "Documents". The demo Workspaces under
"Workspaces" won't automatically open until you run Code::Blocks
and also give it permission associate it's file extensions.
|
|
Click on the "Catalina CodeBlocks" icon to get started with
the Catalina IDE. |
|
|
Step 2: Open an example "Workspace"
in Code::Blocks and run a simple "Project"
|
Code::Blocks is a nice IDE (Integrated Development
Environment) that is included with Catalina. You could do
everything from the command line, but this way is much better.
Code::Blocks is preconfigured for Catalina, so you don't need to
change anything to use it. |
|
When you first run Code::Blocks, you'll get this window:
 (Click picture to make it big)
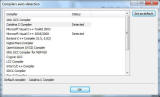
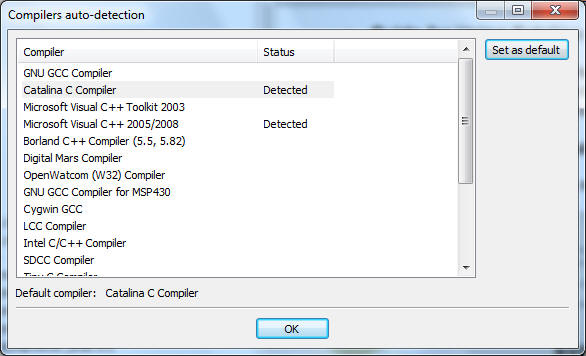
Code::Blocks will find any compilers you have installed.
It should find "Catalina" at least.
The default will be "GNU GCC Compiler" even if you don't
have it installed.
You'll want to select "Catalina" and then hit the "Set as
Default" button. Then, hit "OK" |
|
Next, CodeBlocks should open up and you'll have to close the
"Tips" window and then you'll see this window:
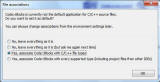
If you're not doing C/C++ coding in anything else, you might
want to select the default "Yes". But, if you do a lot of
work in something like Visual Studio, you might want to select
"No".
You'll also want to close the "Scripting Console" window
because you don't need it. |
|
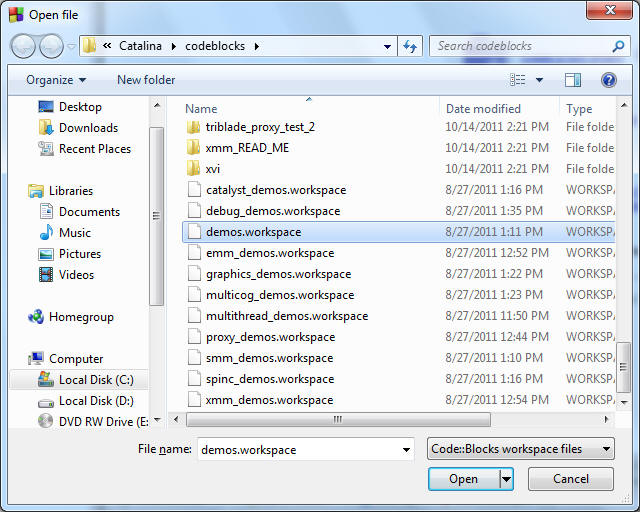
Now, we're ready to open an example project or workspace.
In CodeBlocks, a "Project" is single program where a "Workspace"
is a group of several projects. We want to open the "demos.workspace"
file.
|
Either use "File->Open" from the menu or click the "Open
an Existing Project" link on the "Start Here" tab.
|
|
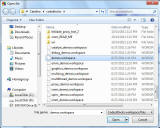
The file browser window should open up already in your
install folder, "C:\Program
Files\Catalina\codeblocks". If you clicked "Open
an Existing Project" change from looking for CodeBlocks
Projects to CodeBlocks Workspaces with the drop menu in the
lower right corner. Then, scroll all the way down to
the bottom and look for "demos.workspace" like this:
|
|
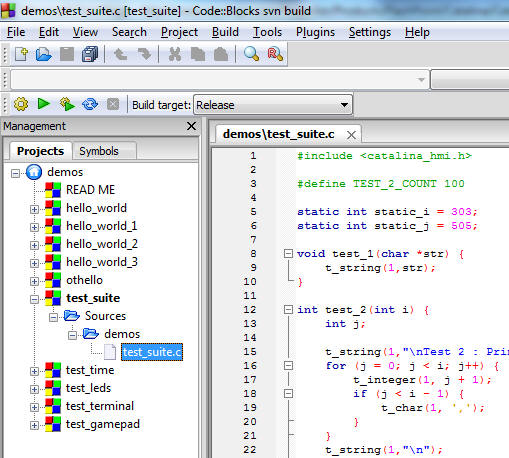
Once you have "demo.workspace" open you should see these
projects available on the left side of the screen:
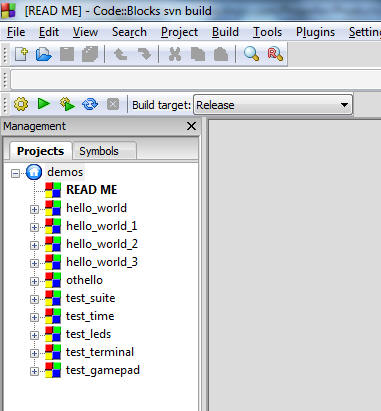
Notice that the "active" project, in bold font, is "READ
ME". We're going to "activate" the "test_suite" project
next by double-clicking on it. But, you can also
right-click and "activate project" to select it. |
|
|
These examples can be run without a FlashPoint module,
because they are tiny. Let's get our feet wet by running
the "test_suite" example. We are using this example because it
waits for a keystroke from our terminal window before showing
things on the screen. The "hello_world" examples just
output once to the screen and then stops and so we might miss it...
|
Double-click on "test_suite" to select that project and
then expand the tree to expose the "test_suite.c" source
file and double-click on it to see the code:
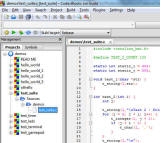
|
|
|
Now, before we build and run the code, we have to tell
Catalina something about our hardware and where we want to
output to go. The default is TV output on a Hydra board.
So, unless that happens to be what you have, we'll have to
change some "Build Options". |
|
To start with, we'll output to over our serial connection to
a terminal program on the PC. It is assumed that you have
the usual serial connection for programming on pins P30 and P31
and that you have a 5 MHz crystal. If you don't have the
usual 5 MHz crystal, you'll need to edit the "FlashPoint_DEF.inc"
file first. |
|
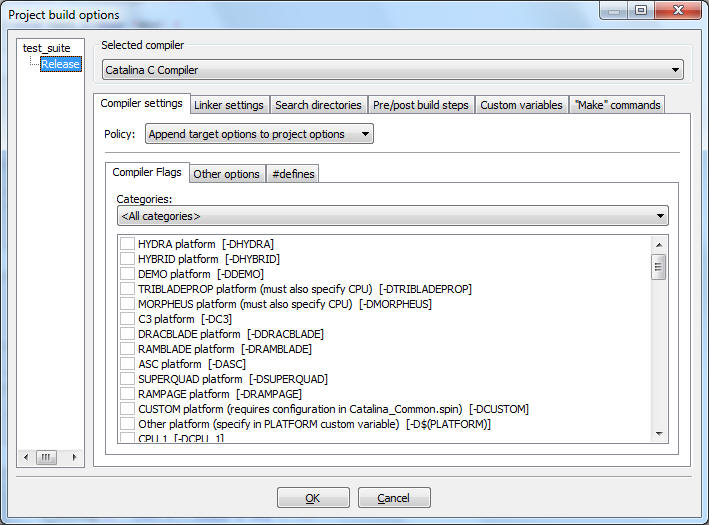
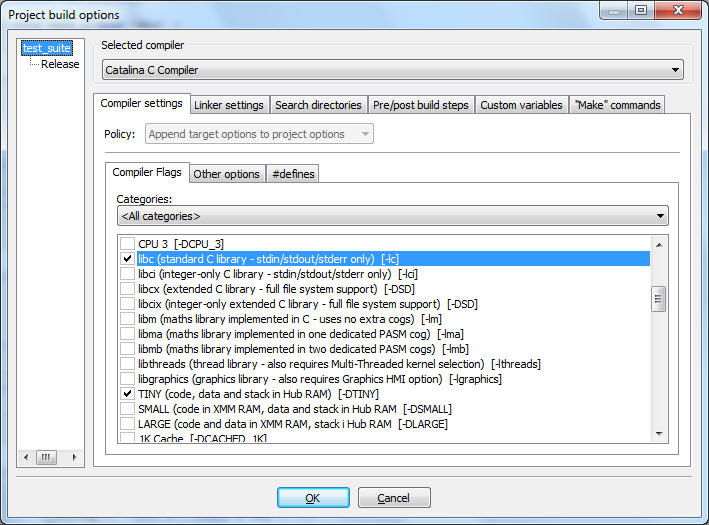
Either right-click on the "test_suite" project and select
"Build Options..." or use the menu to select Project->Build
Options... to bring up this window:
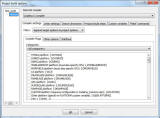
Now, the left window should show a tree with "test_suite" at
the top and "Release" under it and highlighted.
Unfortunately, this window comes up
with "test_suite" selected at first and then "Release" selected
after the first build, but it's better if we select all
our build options with "test_suite" selected. You can see
that no options are selected under "Release". Now, click
on "test_suite" in the left window and you'll see the same
options, but now "libc" and "TINY" are selected.
Note that having these two identical places to select build
options can be a problem... For this
guide,
make sure that no options are selected under "Release"
and only select build options with the project "test_suite"
selected.
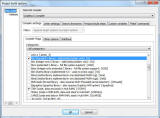
Now, scroll up and select "SUPERQUAD platform". We
aren't going to actually use SuperQuad because this is a "tiny"
app, but this will tell the compiler we have a 5 MHz crystal and
not a 10 MHz crystal, which is the default.
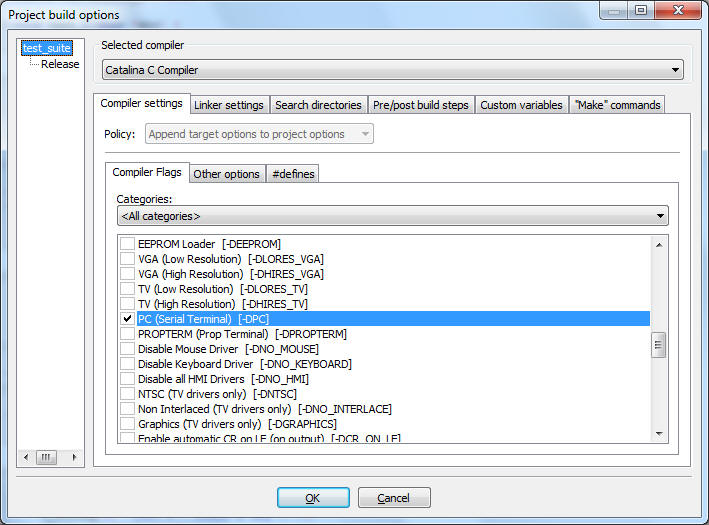
Now, scroll down and select "PC (Serial Terminal)" so as to
send all print command outputs to the serial port so we can see
them with our terminal program on the PC:
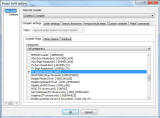
Verify that the only build options selected are "SUPERQUAD
platform", "libc", "Tiny" and "PC (Serial Terminal)".
Optionally, especially if you intend to use the Propeller
Serial Terminal to view the output, you might want to also
scroll down and select the "Enable automatic CR on LF (on
output)" option. Otherwise the text won't show up exactly
right on the terminal.
Hit the "OK" button to apply the settings and close this window.
|
|
Now, we're ready to build the executable from the code.
Either right-click on "test_suite" in the left window and select
"Build" or select "Build->Build" using the menu. At the
bottom of the screen you should see this:
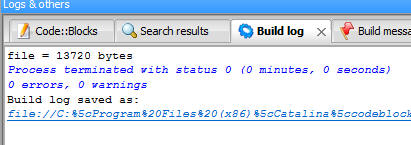
|
|
Now, we're ready to try out the code. This should work
on any Propeller board as long as it has the usual 5 MHz crystal
and serial connection to a PC. From the menu, select
"Tools->Download to HUB RAM".
After about 20 seconds you should see this at the bottom of
the screen:
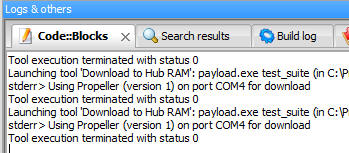
Make note of the COM port. We'll need to know which
com port the Propeller is connected to when we start the serial
terminal. |
|
Now, open your serial terminal program and connect to the
port mentioned above at 115200 baud. Hit any key in the terminal and you
should see this appear:
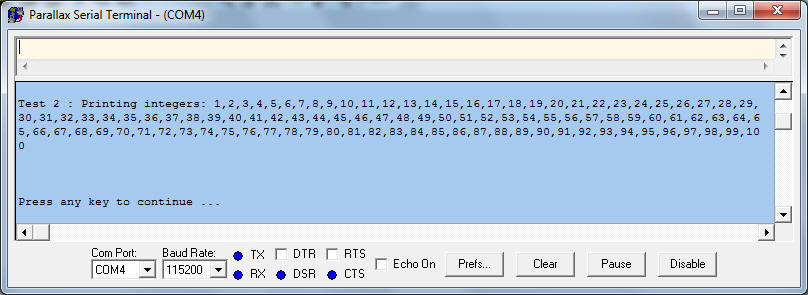
If the text is aligned all funny, it's because we need to
select the "Enable automatic CR on LF (on output)" build option
to make it look right with the Parallax Serial Terminal (see
above). |
|
Congratulations you've just completed this step and built
and run a Catalina C program. |
|
Note that when the this test program is complete (after you
"Press any key" a few times), the Propeller will reboot. This
is because the "main" routine doesn't end in an infinite loop.
Any time "main" is finished, Catalina reboots. |
|
If you want this program to run again after a reboot, you can
program EEPROM with this code by selecting one of the
"Tools->Download to EEPROM" options from the menu. |
|
|
 (Click picture to make it big)