|
RS232 Interface with Advanced Driver
 |
Once your uOLED-96-Prop is programmed with this, it acts as a serial
display. You can use, e.g., the PropPlug to connect it to your
computer and send it serial commands via Hyperterminal or other Windows
programs. A test program is available to try out all commands.
|
|
This interface is meant to replicate that of the uOLED-128-GMD1.
You can look at the manual
for that device for syntax. Also, look at the source code for a list
of additional commands. Also, look at the
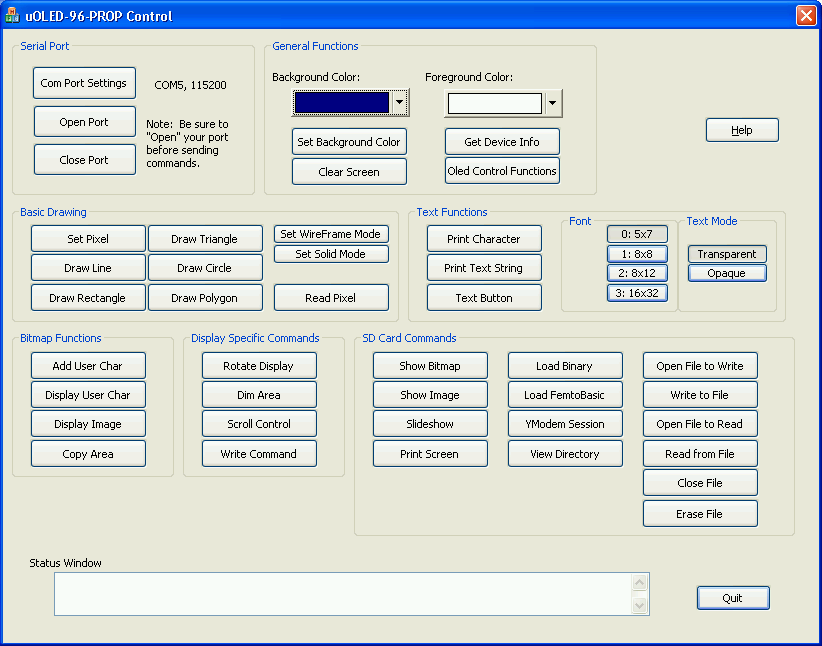
Windows App screenshot below for commands in groups.
|
|
The V4 driver has been expanded and partially converted to assembly in
order to achieve fast image display. Support for 2 new fonts and
transparent text are among the additional features.
|
|
Downloads:
 |
|
|
|
|
|
Includes a few types of Windows bitmaps, raw data images
(test1,test2.dat), and two slideshows (test4 (flying dove), test5.dat (F-14
fighter)).
|
|
You need to copy these to the uSD card to use them. See "Usage
Notes" for a method of using HyperTerminal to transfer these files.
|
|
|
|
Usage notes:
|
It takes the driver ~200ms to initialize, so don't send any commands for
this time after power up.
|
|
The default baud rate is 115200 and the driver will accept commands at
this rate once the Prop logo is shown (~5 seconds after power up).
|
|
The driver will wait for 5 seconds for the "U" character ($55) (see
uOLED-128-GMD1 manual) for automatically determining baud rate. Baud
rates up to 57600 can be auto-detected. After 5 seconds, the driver
will default to 115200 baud and show a splash screen with the Prop logo.
|
|
HyperTerminal can be used for some commands. For example, type
"@Y" to begin a ymodem file transfer session where you can send and receive
files from the uSD card. Or, type "@F" to begin a FemtoBasic session.
|
|
After receiving a valid command the display will send an "ACK" character
(looks like a spade in HyperTerminal). A "NAK" character is send for
an invalid command.
|
|
Windows Bitmap files stored on the SD card can be displayed. All
types are thought to be supported.
|
|
Images can also be displayed from raw data, either from serial or SD
card. Both 8 and 16-bit native formats are supported. The file
format is a 3-byte header (width, height, bit-depth) followed by pixel data.
Slideshows can also be displayed from SD card using this file format with
additional pixel data appended. So, the first frame of a slideshow can
also be displayed with the display image command.
|
|
Filenames extensions .bmp, .dat, .bin will be added if not included in
name.
|
|
|
|
|
Screenshot:
|
|
This tool lets you test out the RS232 interface.
|
You first need to connect your uOLED-96-Prop to the computer with a
serial connection. (I used the PropPlug).
|
|
Just set port settings, open the port, and push buttons to send
commands. A status window at the bottom shows what commands were sent
and the response.
|
|
Usage notes:
|
Don't forget to "Open Port" before sending commands. (Closing the
port may cause the uOled to reset, just like with HyperTerminal).
|
|
Lines and text a drawn with the currently selected foreground color.
|
|
The screen is cleared with the currently selected background color.
|
|
Two buttons select between filled and hollow shapes.
|
|
Two buttons select between transparent text and filled-in background
text.
|
|
The status window usually shows all the data bytes sent to the display
and the response.
|
|
Slideshows will continuously repeat until any character is sent.
One way to stop it is to send a single character command, like "Clear
Screen" with the interface.
|
|
The "Help" function is a placeholder only, there is no help available
yet (sorry!).
|
|
You can see the contents of the SD card using the "View Directory"
button.
|
|
|
|
|
Making Slideshows from Animated GIFs
|
The dove and fighter jet test files (test4.dat, test5.dat) were created
from animated gifs. I used the free tool "IrfanView" to extract images
from the animated gifs. I also used IrfanView to take the extracted
files and batch crop, resize, and convert them to bmp files. Then, use
the "Slideshow" button on the OledInterface app provided above to convert
the series of pictures to the .dat file.
|
|